Battlefield Mapping Tutorials
Converting Your BF1942 Map To Desert Combat
Tutorial updated 01 - 11 - 04 for .6F release
This tutorial was written to teach you how to convert your BF1942 map to Desert Combat, so you can have all the modern day fun Desert Combat brings. This will create a very small file size RFA. Anyone you want to share this with, will also have to have the BF1942 version of your map. I'll be using my SOC_Pearl_Harbor map as the example map in this tutorial.
Tools used for this tutorial:
• Battlefield 1942 (obviously you need the game)
• Battlecraft 1942 (not used for this tutorial, but needed it to create
the battlefield version, hehe)
• RFA Extractor 1.1 (download
here) 11kb
• GMakeRFA (download
here) 796kb
• PreCache.con (download
here) 2kb
• Your Existing Battlefield 1942 version map
Step 1:
Create a folder on your desktop, give it the name of your map, but add _DC to it. Naming isn't important, but if you follow this tutorial, you'll have no problems. So, my map is named SOC_Pearl_Harbor, so I created a folder on my desktop called SOC_Pearl_Harbor_DC.
Step 2:
If you haven't done so already, use RFA Extractor and the entire contents of your Battlefield version map somewhere.
If you have, go to the folder where your map has been extracted. Delete everything you see in the image below highlighted in light red, and keep everything you see highlighted in light green.
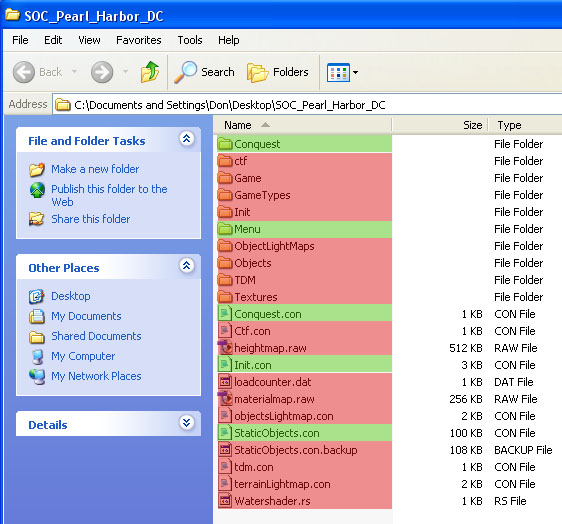
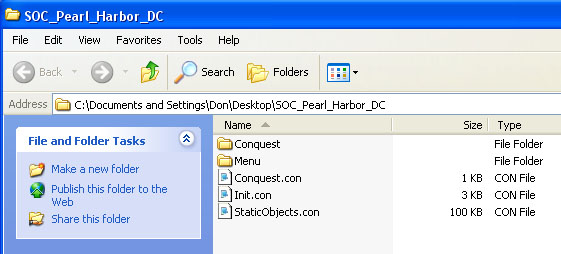
Your new directory, should now look something like this:
After you're all done that, its time to open up the files and make the Desert Combat changes to them.
Open the Conquest Folder, delete all files, except these:
ControlPointTemplates.con, ObjectSpawns.con and ObjectSpawnTemplates.con
If you also have TDM, CTF or COOP modes, you'll need to delete and keep the same files as listed above.
Go into the MENU folder, and open up the Init.con file with Notepad. You'll want to add this line:
game.setServerInfoIcon ../../bf1942/levels/DC_Battle_of_73_Easting/menu/serverInfo.dds
This will show the little Desert Combat helmet next to your map name in the maps list for when you are selecting which maps to play in game.
Next, in the same Init.con file, you'll need to make sure you have this line set, or changed from bf1942 to DesertCombat:
game.setMapId "DesertCombat"
Save and close that Init.con in the Menu folder, you're done with that file.
Next, open the main Init.con file, located in the main directory of the folder you have all your other files in. You'll want to scroll down to the bottom and replace the Battlefield classes with the Desert Combat Classes, which are here:
game.setTeamSkin 1 IraqSoldier
game.setKit 1 0 Iraq_Sniper
game.setKit 1 1 Iraq_Assault
game.setKit 1 2 Iraq_AT
game.setKit 1 3 Iraq_HeavyAssault
game.setKit 1 4 Iraq_Support
game.setKit 1 5 Iraq_SpecOps
game.setTeamSkin 2 USSoldier
game.setKit 2 0 US_Sniper
game.setKit 2 1 US_Assault
game.setKit 2 2 US_AT
game.setKit 2 3 US_HeavyAssault
game.setKit 2 4 US_Support
game.setKit 2 5 US_SpecOps
Save it.
Ok, now you need to change the vehicle names so that the new DesertCombat vehicles will show up in your map.
Now, go into the Conquest folder and open the ObjectSpawnTemplates.con file with notepad.
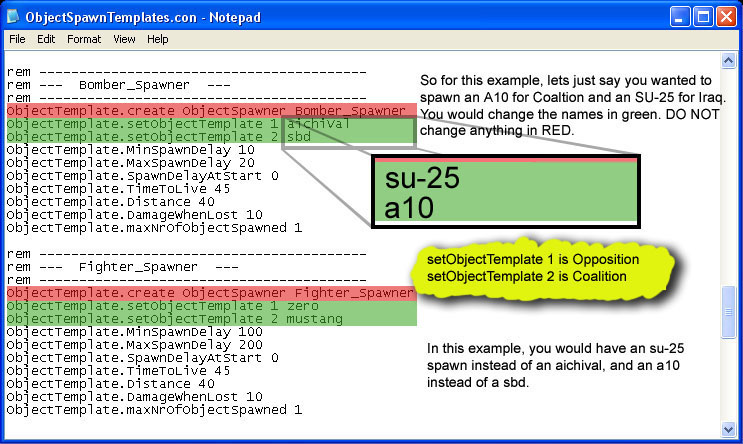
You'll only want to edit the areas circled in GREEN not Red. Change the ObjectSpawner name, and you're in for some headache!
This is where you change the vehicles to spawn. Instead of a Jeep, spawn a Humvee!
So basically, in the first example under lighttankspawner, you could throw a M1A1 instead of a Sherman, and a T72 instead of a Chi-Ha.
You can get a full list of vehicles from this link: Desert Combat .06F list
Save the file when you're done. If you have your map setup for DeathMatch or CTF, you'll have to also edit the ObjectSpawnTemplate.con file in those directories too.
Last thing you want to do before you pack it up, is add the Precache.con file in the main map directory, same place you have the StaticObjects.con file. Without this, you're packed map will not play.
Now you are ready to use GMakeRFA and pack this bad boy up to play your Battlefield map Desert Combat style!
Open up GMakeRFA, you should see this:
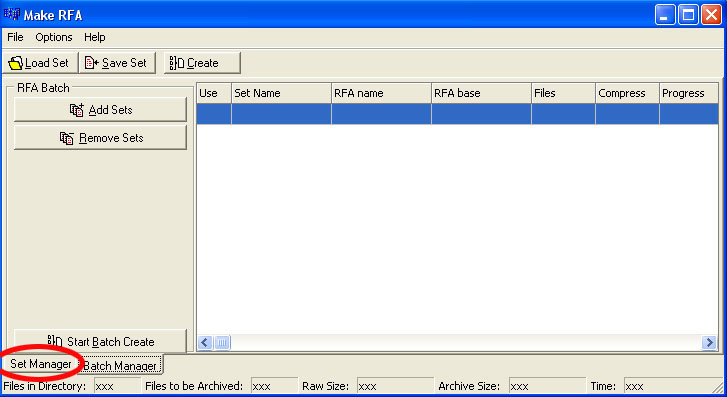
Now you want to click on the Set Manager button you see circled in red in the image above.
Then you'll see this.
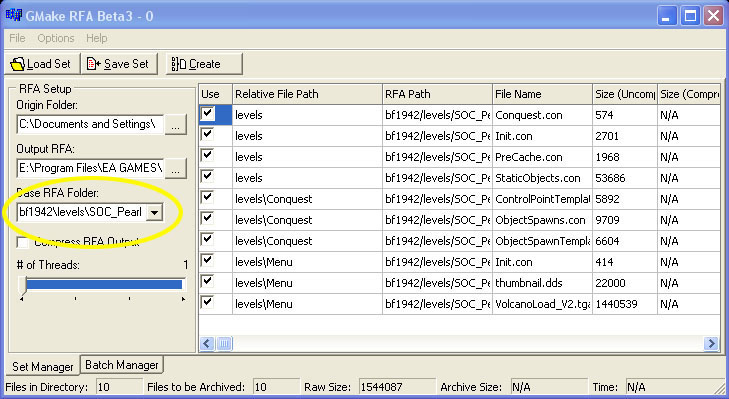
In the Origin Folder box, you want to browse to the folder you created on your desktop, that contains the remaining map files you didn't delete.
In the OutPut RFA box, you want to browse to your DesertCombat maps folder in your Battlefield 1942 install directory. With a default install, you'll find it here: C:\Program Files\EA GAMES\Battlefield 1942\Mods\DesertCombat\Archives\bf1942\levels
Be sure to name the OutPut RFA the same name as your battlefield version, so in this example, SOC_Pearl_Harbor.rfa
In the Base RFA Folder box, circled in yellow, you want to simply put: bf1942\levels\YourMapName
Now, just click on the CREATE button and in a few seconds, it'll be finished, and you'll have a very small file sized RFA file for your DC version of your Battlefield map.
One thing to check, and I don't think it matters, some versions of GMakeRFA create the RFA with an ALL CAPS extension instead of the default lowercase extension (ex. SOC_Pearl_Harbor.rfa but this GMakeRFA version makes SOC_Pearl_Harbor.RFA). I'm not sure if this will cause the map not to load, but you can easily rename the extension to be lowercase with no worries.
Thats it! If it works, you did everything correct and you can now drop some Hellfires on your map from the good ol'e Apache!
If it didn't work for you, first double check all steps, then contact me if it still doesn't work. I had to re-do this tutorial cause I lost the images, and because of some other information I found missing: tfcmaster@tfcmaster.net
And of course, if you want a custom loading screen and thumbnail, you'll have to add those in as well, using a combination of GMakeRFA and my other tutorials for adding custom loading screens and thumbnails.