Battlefield Mapping Tutorials
Adding custom models from Mods to your map
Tutorial by: TFCmaster.net
June 15th 2004
This tutorial will show you how to add a model from any given mod (with the exception of Battlecraft Vietnam, haven't tested these models yet) to your map, be it BF1942, DesertCombat or any other mod. In this tutorial, we are going to add a Road To Rome building to a DesertCombat map.
Tools used for this tutorial:
• Battlefield 1942 (obviously you need the game)
• Battlecraft 1942 (if you use a different editor, you'll know what to do
and what to change)
• RFA Extractor 1.1 (download
here) 11kb
• Your existing map
Step 1:
First, create a folder on your desktop, call it ADDMODEL. We're going to use that for all the files we'll be needing to add to our DesertCombat map.
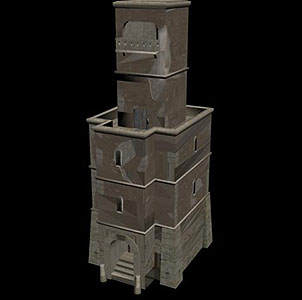
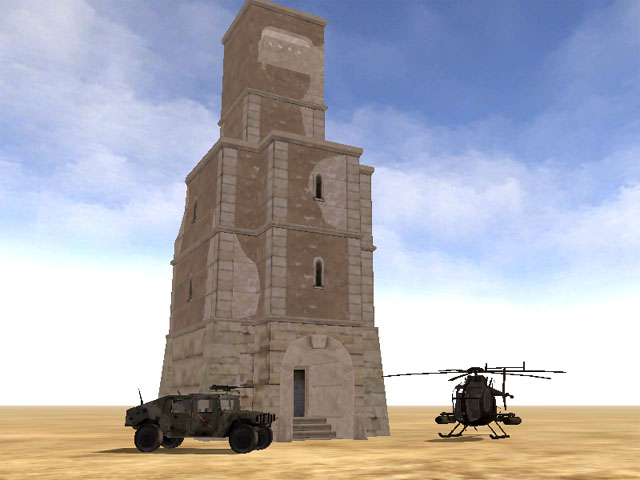
You'll need to know the name of the model you want to add to your map. In this tutorial, we are going to take the italytower_m1 model, which is used in the Road To Rome map called Baytown. Here is a screenshot of the model itself. (Don't mind the textures looking weird, this was rendered quickly in 3DSMax just to show the model we're using).
So what you'll need to do is extract (using RFA Extractor) both of the Standard Mesh files from the StandardMesh.rfa of the mod you are taking the model from. Both files will end in different extensions, one is the .rs file (contains all the texture paths and coordinates) and the .sm which is the actual model file. Extract these to your desktop folder you created for this tutorial called ADDMODEL. We're going to put everything into this folder for ease of learning the 'how to' of this tutorial.
Step 2:
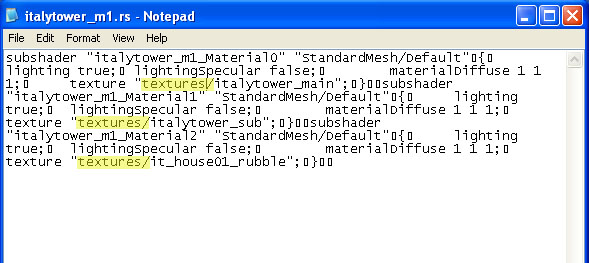
Now you'll need to extract the texture files for this model in order to have a textured model show up in your map. You can find out the texture name(s) that are used for your custom model by opening the .rs file of the model you want to add. In this case, the italytower_m1.rs file will give us the information we need. You'll find the texture file names, minus the .DDS extension. So you'll need to use RFA Extractor to extract the three texture files this model uses, you'll find them in the mods Texture.rfa file. Extract them to the ADDMODEL directory you created on your desktop.
For this model, the three texture files are:
italytower_main.dds
italytower_sub.dds
it_house01_rubble.dds
Step 3:
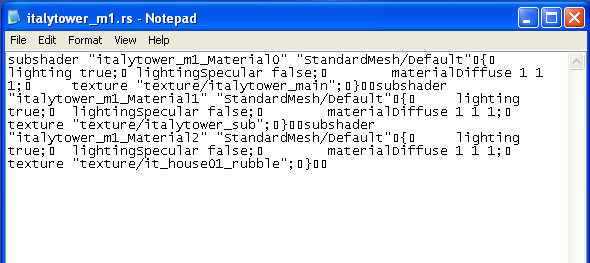
With NOTEPAD, open the Italytower_1m.rs file. Again, this is the file that contains the texture paths and coordinates. When you have it open, you'll see the information as posted in the above picture.
To better keep your maps directory structure clean,
we're
going to change the texture path from texture/ to /textures.
I
have highlighted the areas below that need to be changed for this model. Keep in
mind, the model you're trying to add to your map may have more or less texture
files for it. This italytower_m1 has three separate texture files that we'll
need to add this model to our DesertCombat map. So change the paths from
texture/ to textures/. It's not good to use NOTEPADS 'replace' command, as it
will replace other words named texture that we don't want to change. The ones in
RED, DON'T CHANGE, the ones in GREEN, DO CHANGE.
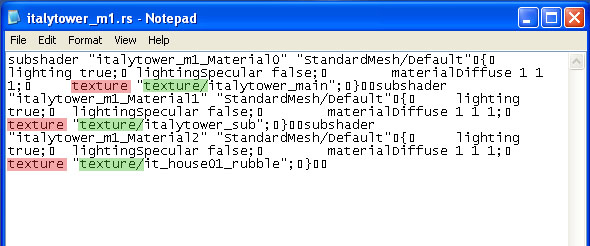
Once you make the changes, your file should look like this:
Save the file and close it, we are done with this file.
Step 4:
Now we need to grab the models Object files. You'll find these in mods Objects.rfa file. Some mods Objects.rfa directory structures are different, so you may have to look harder for what you are looking for, in this case, the object files for italytower_m1. You'll see the files you'll have to extract for this model in the screenshot below:
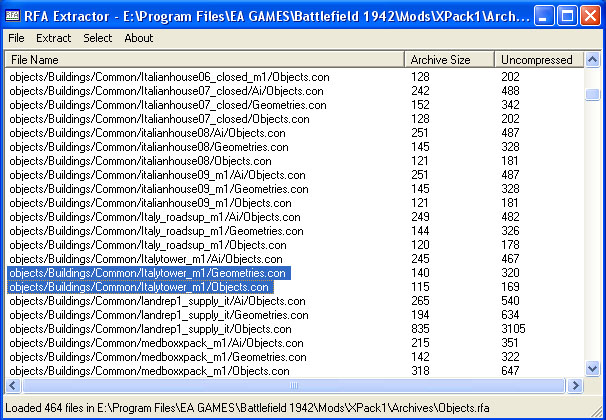
Extract them into the ADDMODEL folder you created on your desktop. These files are necessary for your map to actually show the model in your map. You can add the standard mesh files to your map like we did in Steps 1 & 2, but without these Object files, your model will not physically show in the map. Moving on.........
Step 5:
Open the ADDMODEL folder you created on your desktop. In it, you should now see the following folders (RFA Extractor keeps directory structures from any RFA File extraction.
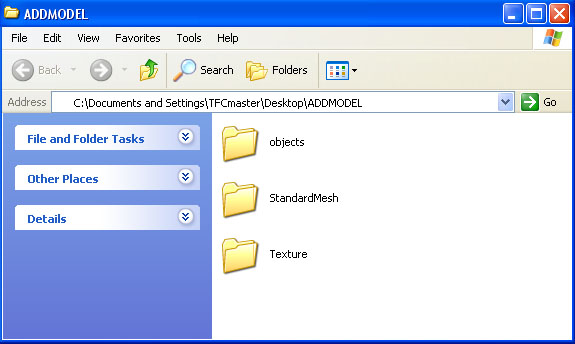
First you'll want to open the objects folder. In there, you'll find another folder called Buildings and if you open that you find Common and if you open that, you'll find a folder called Italytower_m1
The directory structure in this desktop folder is of no real importance, so don't worry about that right now. So finally open the Italytower_m1 folder and you'll find Geometries.con and Objects.con. Don't worry if you see more files, some models have more object files required. If you're model just so happens to be one that does, just follow along with the tutorial.
These two files are essential for adding a custom model to your map. The Geometries.con file basically tells the game to load the StandardMesh file and the object template so the custom model will show and the Objects.con file tells the game that the model has geometry and collision physics and other things. Nothing of which is going to be touched here, so don't worry.
But what you are going to do is create a Text Document in this directory and name it:
Italytower_m1.con
In this Italytower_m1.con file, you'll want to add the following lines:
run objects
run geometries
Save and close the file.
Go back to the main Objects folder, create a TEXT DOCUMENT in this directory and name it:
objects.con
In this objects.con file, you'll want to add the following line:
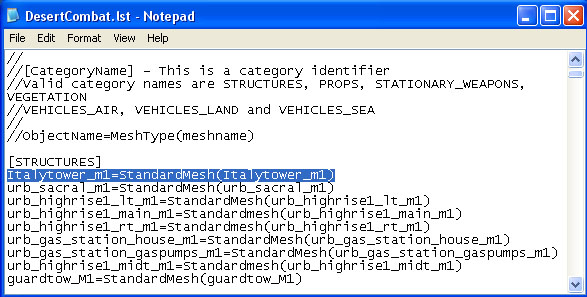
run Italytower_m1/ItalyTower_m1
Save and close the file. You are now done with the directories in the ADDMODEL directory you created on your desktop for now. You will not be editing any more files in here so you can close it if you have it open.
Step 6:
Now we have all the files extracted and have modified the texture paths in the Italytower_m1.rs file, we have also created the 2 extra objects.con and Italytower_m1.con files we'll be needing. It is time to get the model to show up in Battlecraft and the game.
In your DesertCombat.lst file, found in your main Battlecraft install directory, you will want to add the following line under Structures:
Save and close the file.
This will allow the model to show up in Battlecraft once you add all the necessary files to your map, which we are about to do.
Step 7:
Open up Battlecraft (we are using Battlecraft v. 2.1). Load up your map as you would if you were going to make normal changes.
For this tutorial, we created a DC map called DC_ADDMODEL
Once your map is loaded up, from the main tool bar click TOOLS > ADD FILE TO ARCHIVE
First thing we're going to add is the StandardMesh files to the map. So click on the Add button and browse to the ADDMODEL folder on your desktop, open the StandardMesh directory in that one and highlight both files. Then in the Destination box, click at the end of your map name and add the following:
/StandardMesh
This will add those 2 files to your maps StandardMesh directory. If you're map didn't have one, this will create one so don't worry.
Should look like this below:
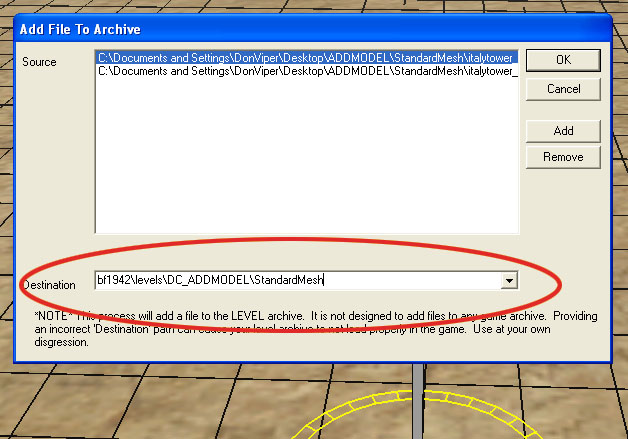
Click OK. Battlecraft doesn't give you any kind of confirmation that the files have been added, but they are. It only takes a fraction of a second to add them to the map, and the Add File To Archive dialog will close.
Again, click on TOOLS > ADD FILE TO ARCHIVE
Click the Add button and browse again to the ADDMODEL directory on your desktop. Then to the Texture directory, where you will find the three texture files for this model. Highlight them all and click open. Then in the Destination box, you'll want to add this at the end of your map name:
\Textures
Why Textures and not Texture? Remember we renamed all the texture paths in the .rs file? Why? Because if we had left it as it were, after adding everything we're adding for this model, you would wind up with a Texture and a Textures directory in your map directory structure, which, you want to keep as simple and uncluttered as you can because a cluttered map directory structure can lead to all kinds of game play issues. You should see this:
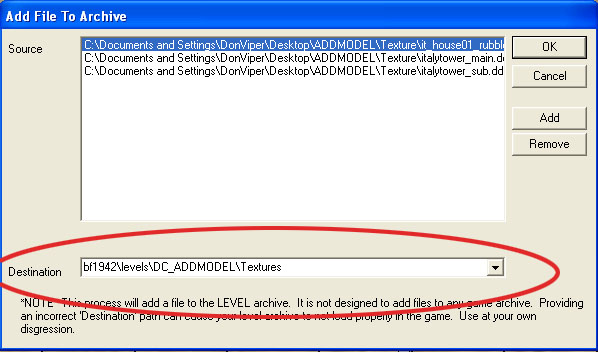
Click OK. Again, Battlecraft doesn't give you any kind of confirmation that the files have been added, but they are. Adding texture files, depending on how large in file size they are can take a few seconds or a little longer, but after they've been added the Add File To Archive dialog will close.
Now you've added the standard mesh files, the texture files and all we need now is the Objects files. These are going to be added the same way, but 1 file will go into a different directory from the others.
Click TOOLS > ADD FILE TO ARCHIVE
Click Add and browse to the ADDMODEL directory on your desktop. Select Objects.con and hit Open. In the Destination box, add the following to the end of your map name:
\Objects
Hit OK, the file gets added and the Add File To Archive dialog closes.
Once more, click TOOLS > ADD FILE TO ARCHIVE
Click Add and browse to the ADDMODEL directory on your desktop, clicking through the Buildings and Common and Italytower_m1 directories so you see the Geometries.con, Objects.con and Italytower_m1.con files. Highlight all three and hit Open. In the Destination box, add this to the end of your map name:
\Objects\Italytower_m1
Hit OK, the files get added and the Add File To Archive dialog closes.
One last thing to add. Using Battlecraft's File Archive Editor (F11), open your maps Main Init.con file and add this line:
run Objects/Objects
Hit the SAVE button. Battlecraft likes to erase custom things you type here after you do a regular saving of your map, so you may have to add this line back in time and time again, but just be sure you do or else you wont see any custom models you've added like the one we added here in this tutorial.
All the files are now added to your map to have them show in both the editor and the game itself. So now you can add the Italytower in just as if you were adding any other building you've added before. Don't worry if your textures look like hell on the object in Battlecraft, they will not look like that in the game. Here is a screenshot of the tower, in our DC map after all is said and done.
Tutorial by: TFCmaster.net
June 15th 2004